有些時候開演練環境要進行教育訓練,需要有指令界面的操作。但別人不能用 ssh 連公司外部的 22 port,但可以連網頁。
這樣子得弄個中介跳板,不只用瀏覽器充當 Putty 功能,還要讓 22 port 的存取由跳板發動。而桌面電腦只有用瀏覽器連接網頁,不涉及直接連線 22 Port。
這樣子得弄個中介跳板,不只用瀏覽器充當 Putty 功能,還要讓 22 port 的存取由跳板發動。而桌面電腦只有用瀏覽器連接網頁,不涉及直接連線 22 Port。
這邊是一款挖到一個 Python 的怪怪工具~webssh
使用方式:用這個 python 寫的瀏覽器程式,訪問內網網路的 22 port。
外網單一跳板搭配 self-signed SSL 憑證開連結讓瀏覽器連接。
這樣子就不是從外網直接存取 22 port,而是透過網頁操作,實際上的 22 port 連線只發生在內網網路中。
這邊在 GCP 上設置。並預計以外網 IP 上用網頁連線,在於網頁工具內以內網 IP 連線其他環境。
使用方式:用這個 python 寫的瀏覽器程式,訪問內網網路的 22 port。
外網單一跳板搭配 self-signed SSL 憑證開連結讓瀏覽器連接。
這樣子就不是從外網直接存取 22 port,而是透過網頁操作,實際上的 22 port 連線只發生在內網網路中。
這邊在 GCP 上設置。並預計以外網 IP 上用網頁連線,在於網頁工具內以內網 IP 連線其他環境。
GCP 雲端環境前置步驟
現在的雲端環境比較精細,會切割 VPC,我還不太會,直接使用 default VPC。
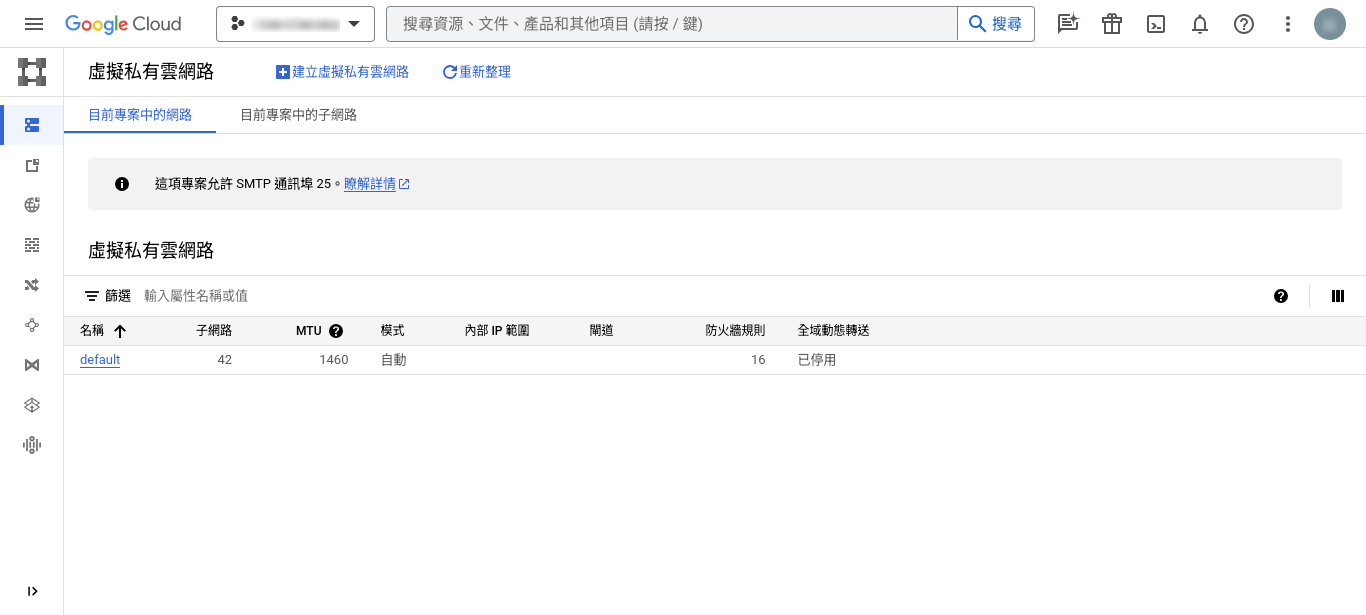
但是 default VPC 為了方便測試(紀錄年度:2023~2024),防火牆規則允許了有點寬鬆的規則:允許外網可以連 SSH。
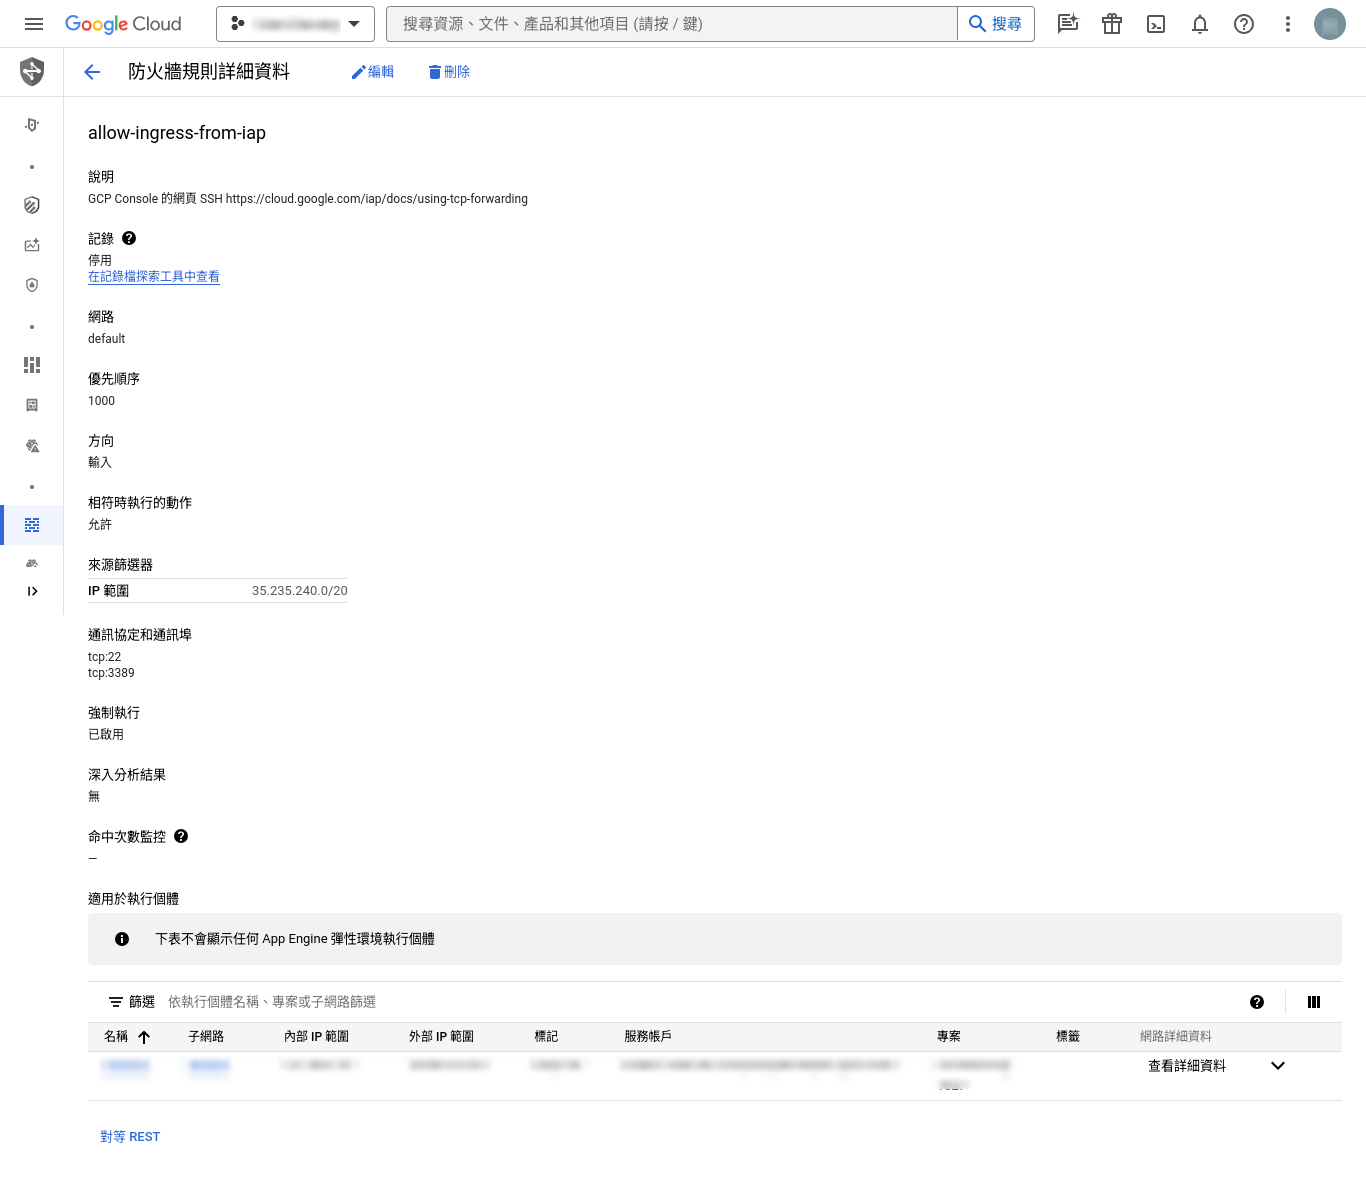
不過各大公有雲的 Cloud Console 還會有網頁版 SSH 功能,在 GCP 稱作 Identity-Aware Proxy。不過這對 VPC 來說也是外部網路,因此需要有 SSH port 允許規則。
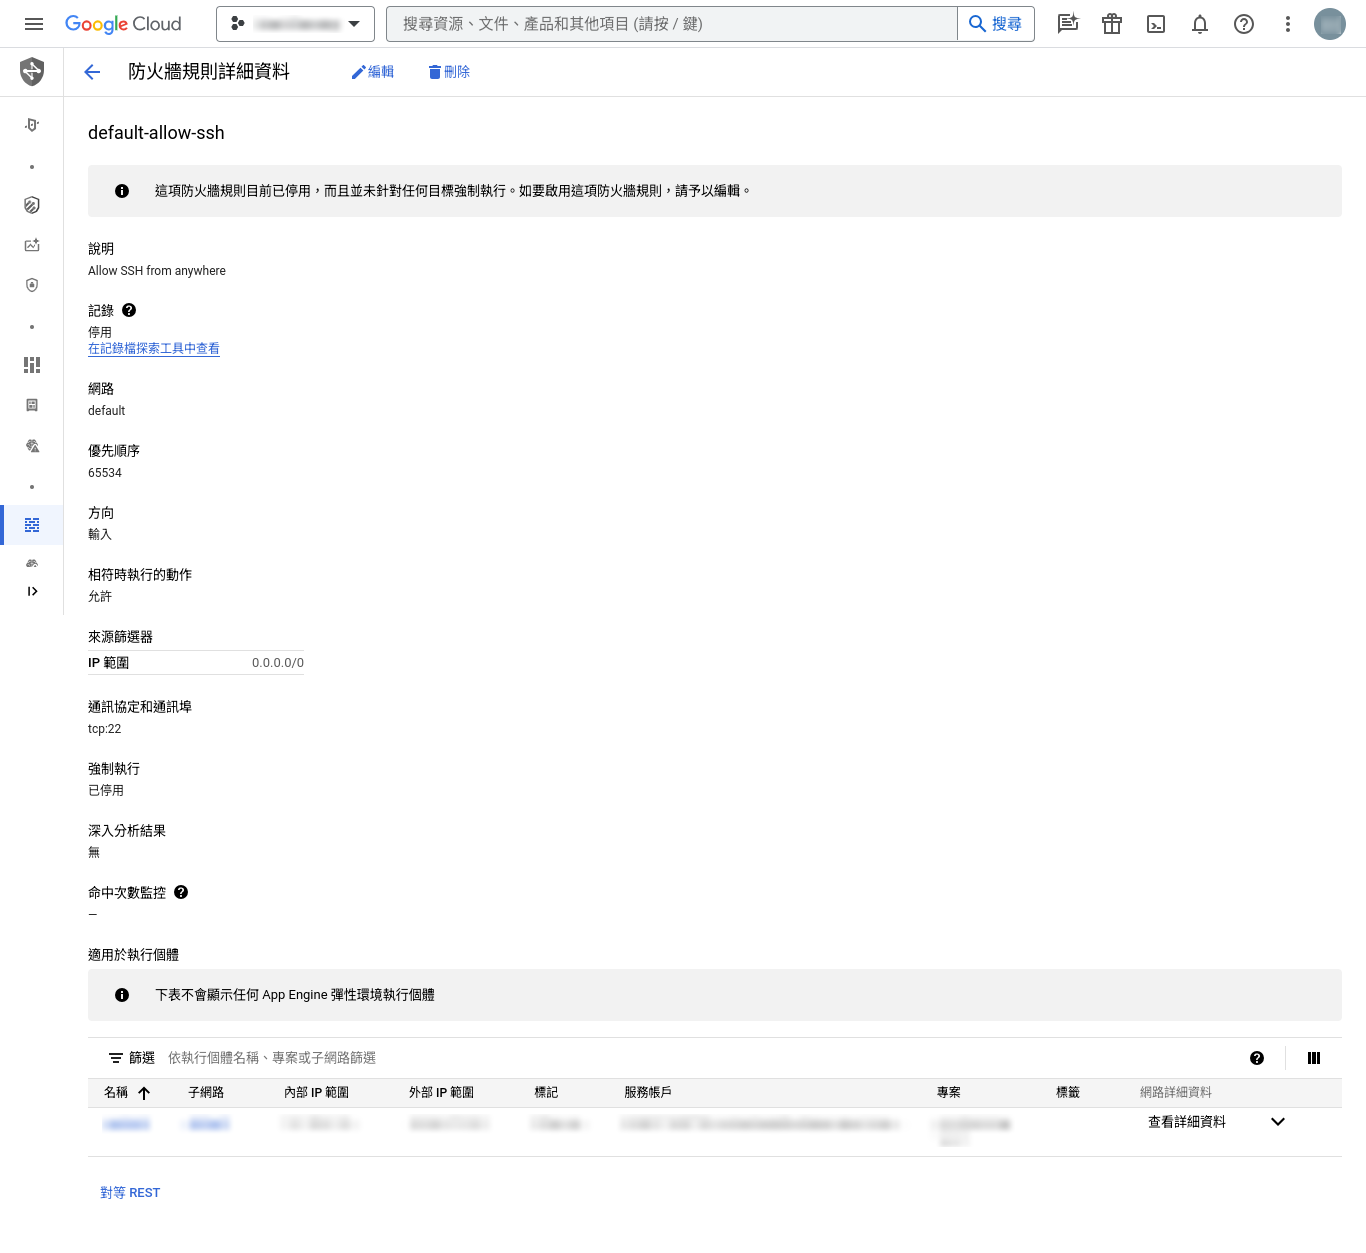
為了避免不必要的麻煩(被駭會噴摳摳還有來自咕狗的警告信),這邊筆記一下
- 關掉這條 SSH 全開的規則:可以不用刪掉,用停用的就好。
- 開通針對 IAP 的規則,照著這邊作就可以了:Using IAP for TCP forwarding | Identity-Aware Proxy | Google Cloud
接著就開一個 VM,並且準備一個帳號,避免用 root OS 帳號啟動這程式。就算只是測試環境,被跳板還是有法律責任ㄉ。。所以可以多想到的就多準備一點。
Note:通常雲端 SSH 會用登入雲端的帳號(信箱)作為 sudoer 進入 VM,這邊方便紀錄,切換到 root 底下執行。
[root@web-based-ssh ~]# groupadd webssh
[root@web-based-ssh ~]# useradd webssh -g webssh
還有把 SSH 的密碼登入開啟
[root@web-based-ssh ~]# sed -e 's/^PasswordAuthentication=.*/PasswordAuthentication=yes/g' -i /etc/ssh/sshd_config
[root@web-based-ssh ~]# service sshd restart
[root@web-based-ssh ~]#
準備 Self-Signed SSL 憑證
因為需要在網路上奔跑,還是要用悄悄話溝通。
自己當 CA 單位:就是作莊的意思ㄅ~用藍字代表
[webssh@web-based-ssh ~]$ mkdir root
[webssh@web-based-ssh ~]$ openssl genrsa -out root/ca.key 4096
Generating RSA private key, 4096 bit long modulus (2 primes)
..........................................................................................++++
...............................................................................................................................................................................................................................++++
e is 65537 (0x010001)
[webssh@web-based-ssh ~]$ ls root/
ca.key
[webssh@web-based-ssh ~]$
頒發一個憑證給自己的 CA 單位~恭喜
[webssh@web-based-ssh ~]$ openssl req -new -x509 -days 365 -sha256 \
 -subj "/C=TW/ST=Taipei/O=your_company/OU=your_department/CN=localhost" \
 -key ./root/ca.key \
 -out ./root/ca.crt
[webssh@web-based-ssh ~]$  ls root/
ca.crt  ca.key
[webssh@web-based-ssh ~]$
長一個「這台電腦」的憑證金鑰,這步驟其實跟第一條一樣,只是一人分飾二角
[webssh@web-based-ssh ~]$ mkdir server
[webssh@web-based-ssh ~]$ openssl genrsa -out server/server.key 2048
Generating RSA private key, 2048 bit long modulus (2 primes)
.......................................................+++++
............+++++
e is 65537 (0x010001)
[webssh@web-based-ssh ~]$
長一個「這台電腦」要拿給 CA 單位加持的 CSR 符咒~(或許應該說要拿去祭改拜拜的衣服~)
[webssh@web-based-ssh ~]$ openssl req -new -key ./server/server.key \
 -subj "/C=TW/ST=Taipei/O=your_company/OU=your_department/CN=$(hostname -f)" \
 -out ./server/server.csr
[webssh@web-based-ssh ~]$ ls server/
server.csr  server.key
[webssh@web-based-ssh ~]$
把「這台電腦」的 CSR 符咒,交給自以為的 CA 單位簽署(加持),順利孵出一張憑證
[webssh@web-based-ssh ~]$ openssl x509 -req -CAcreateserial -days 300 -sha256 \
    -CA ./root/ca.crt -CAkey ./root/ca.key \
    -in ./server/server.csr \
    -out ./server/server.crt
Certificate request self-signature ok
subject=C = TW, ST = Taipei, O = your_company, OU = your_department, CN = webssh-based-ssh.c.gcp-project-name-1327.internal
Getting CA Private Key
[webssh@web-based-ssh ~]$
最後可以使用的憑證在這邊。
[webssh@web-based-ssh ~]$ ls server/
server.crt  server.csr  server.key
[webssh@web-based-ssh ~]$
設置 WebSSH 程式
如之前的習慣,這邊以 python venv 來準備環境。
[root@web-based-ssh ~]# mkdir -p /opt/webssh
[root@web-based-ssh ~]# chown -R webssh. /opt/webssh
[root@web-based-ssh ~]# su - webssh
[webssh@web-based-ssh ~]$ python3 -m venv /opt/websshpython3 -m venv /opt/webssh
[webssh@web-based-ssh ~]$ ls /opt/webssh/
bin  include  lib  lib64  pyvenv.cfg
[webssh@web-based-ssh ~]$
進入 venv 後,安裝這東西
[webssh@web-based-ssh ~]$ source /opt/webssh/bin/activate
(webssh) [webssh@web-based-ssh ~]$ pip3 install webssh
Collecting webssh
  Downloading webssh-1.6.2.tar.gz (182 kB)
     |████████████████████████████████| 182 kB 1.3 MB/s
Collecting tornado>=4.5.0
  Downloading tornado-6.4-cp38-abi3-manylinux_2_5_x86_64.manylinux1_x86_64.manylinux_2_17_x86_64.manylinux2014_x86_64.whl (435 kB)
     |████████████████████████████████| 435 kB 12.5 MB/s
Collecting paramiko>=2.3.1
  Downloading paramiko-3.4.0-py3-none-any.whl (225 kB)
     |████████████████████████████████| 225 kB 50.4 MB/s
Collecting pynacl>=1.5
  Downloading PyNaCl-1.5.0-cp36-abi3-manylinux_2_17_x86_64.manylinux2014_x86_64.manylinux_2_24_x86_64.whl (856 kB)
     |████████████████████████████████| 856 kB 49.4 MB/s
Collecting bcrypt>=3.2
  Downloading bcrypt-4.1.2-cp39-abi3-manylinux_2_28_x86_64.whl (698 kB)
     |████████████████████████████████| 698 kB 31.5 MB/s
Collecting cryptography>=3.3
  Downloading cryptography-41.0.7-cp37-abi3-manylinux_2_28_x86_64.whl (4.4 MB)
     |████████████████████████████████| 4.4 MB 28.6 MB/s
Collecting cffi>=1.12
  Downloading cffi-1.16.0-cp39-cp39-manylinux_2_17_x86_64.manylinux2014_x86_64.whl (443 kB)
     |████████████████████████████████| 443 kB 28.5 MB/s
Collecting pycparser
  Downloading pycparser-2.21-py2.py3-none-any.whl (118 kB)
     |████████████████████████████████| 118 kB 32.8 MB/s
Using legacy 'setup.py install' for webssh, since package 'wheel' is not installed.
Installing collected packages: pycparser, cffi, pynacl, cryptography, bcrypt, tornado, paramiko, webssh
    Running setup.py install for webssh ... done
Successfully installed bcrypt-4.1.2 cffi-1.16.0 cryptography-41.0.7 paramiko-3.4.0 pycparser-2.21 pynacl-1.5.0 tornado-6.4 webssh-1.6.2
WARNING: You are using pip version 21.2.3; however, version 23.3.2 is available.
You should consider upgrading via the '/opt/webssh/bin/python3 -m pip install --upgrade pip' command.
(webssh) [webssh@web-based-ssh ~]$
(webssh) [webssh@web-based-ssh ~]$ pip3 list
Package      Version
------------ -------
bcrypt       4.1.1
cffi         1.16.0
cryptography 41.0.7
paramiko     3.3.1
pip          21.2.3
pycparser    2.21
PyNaCl       1.5.0
setuptools   53.0.0
tornado      6.4
webssh       1.6.2
WARNING: You are using pip version 21.2.3; however, version 23.3.2 is available.
You should consider upgrading via the '/opt/webssh/bin/python3 -m pip install --upgrade pip' command.
(webssh) [webssh@web-based-ssh ~]$
簡易啟動 webssh 程式:這會是一個 web service,可以看到會一直吐 log
這邊搭配剛剛自己作莊的 Self-Signed SSL 憑證服用。
(webssh) [webssh@web-based-ssh ~]$ wssh --help
Usage: /opt/webssh/bin/wssh [OPTIONS]

Options:

  --help                           show this help information

/opt/webssh/lib64/python3.9/site-packages/tornado/log.py options:

  --log-file-max-size              max size of log files before rollover
                                   (default 100000000)
  --log-file-num-backups           number of log files to keep (default 10)
  --log-file-prefix=PATH           Path prefix for log files. Note that if you
                                   are running multiple tornado processes,
                                   log_file_prefix must be different for each
                                   of them (e.g. include the port number)
  --log-rotate-interval            The interval value of timed rotating
                                   (default 1)
  --log-rotate-mode                The mode of rotating files(time or size)
                                   (default size)
  --log-rotate-when                specify the type of TimedRotatingFileHandler
                                   interval other options:('S', 'M', 'H', 'D',
                                   'W0'-'W6') (default midnight)
  --log-to-stderr                  Send log output to stderr (colorized if
                                   possible). By default use stderr if
                                   --log_file_prefix is not set and no other
                                   logging is configured.
  --logging=debug|info|warning|error|none
                                   Set the Python log level. If 'none', tornado
                                   won't touch the logging configuration.
                                   (default info)

/opt/webssh/lib64/python3.9/site-packages/webssh/settings.py options:

  --address                        Listen address
  --certfile                       SSL certificate file
  --debug                          Debug mode (default False)
  --delay                          The delay to call recycle_worker (default 3)
  --encoding                       The default character encoding of ssh
                                   servers. Example: --encoding='utf-8' to
                                   solve the problem with some switches&routers
  --fbidhttp                       Forbid public plain http incoming requests
                                   (default True)
  --font                           custom font filename
  --hostfile                       User defined host keys file
  --keyfile                        SSL private key file
  --maxconn                        Maximum live connections (ssh sessions) per
                                   client (default 20)
  --origin                         Origin policy, 'same': same origin policy,
                                   matches host name and port number;
                                   'primary': primary domain policy, matches
                                   primary domain only; '<domains>': custom
                                   domains policy, matches any domain in the
                                   <domains> list separated by comma; '*':
                                   wildcard policy, matches any domain, allowed
                                   in debug mode only. (default same)
  --policy                         Missing host key policy,
                                   reject|autoadd|warning (default warning)
  --port                           Listen port (default 8888)
  --redirect                       Redirecting http to https (default True)
  --ssladdress                     SSL listen address
  --sslport                        SSL listen port (default 4433)
  --syshostfile                    System wide host keys file
  --tdstream                       Trusted downstream, separated by comma
  --timeout                        SSH connection timeout (default 3)
  --version                        Show version information
  --wpintvl                        Websocket ping interval (default 0)
  --xheaders                       Support xheaders (default True)
  --xsrf                           CSRF protection (default True)

(webssh) [webssh@web-based-ssh ~]$
[webssh@web-based-ssh ~]$ source /opt/webssh/bin/activate
(webssh) [webssh@web-based-ssh ~]$ wssh --address=$(hostname -i) --port=8080 --sslport=8443 --certfile='./server/server.crt' --keyfile='./server/server.key'
[I 240110 08:14:17 settings:125] WarningPolicy
[I 240110 08:14:17 main:38] Listening on 10.128.0.16:8080 (http)
[I 240110 08:14:17 main:38] Listening on :8443 (https)
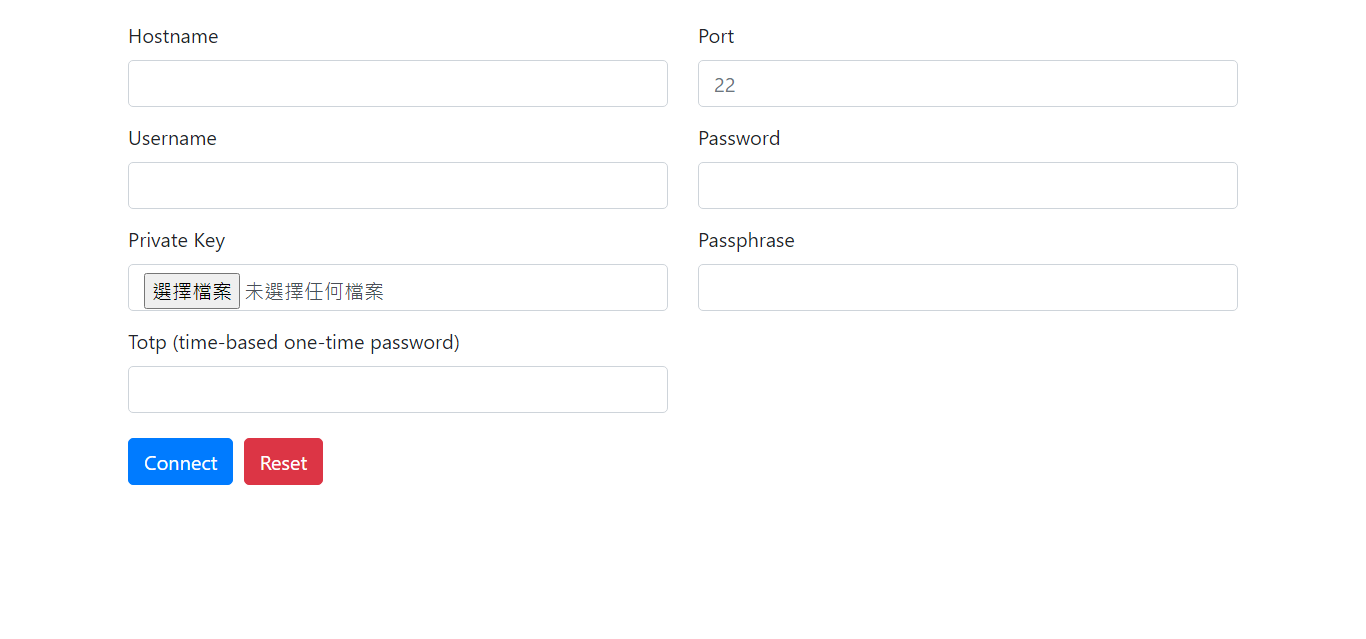
連接進去長這樣,這樣就能打內網帳密登入了
設置成 SystemD 啟動檔。
# /etc/systemd/system/webssh-1.6.2.service
[Unit]
Description=WebSSH, Web based ssh client
After=syslog.target network.target

[Service]
Type=simple
User=webssh
Group=webssh
Environment=SSLKEYPATH=/home/webssh/server
ExecStart=/opt/webssh/bin/wssh --address=%H --port=8080 --sslport=8443 --certfile=${SSLKEYPATH}/server.crt --keyfile=${SSLKEYPATH}/server.key
ExecStop=/bin/kill -- $MAINPID
Restart=on-abnormal
TimeoutSec=300

[Install]
WantedBy=multi-user.target
這樣只要設定開機啟動就可以惹~
[root@web-based-ssh ~]# systemctl daemon-reload
[root@web-based-ssh ~]# chkconfig webssh-1.6.2 on
[root@web-based-ssh ~]# service webssh-1.6.2 start
參考資料
GitHub - huashengdun/webssh: :seedling: 🌱 Web based ssh client
这款 Web SSH 客户端工具超牛逼!爱了 - 知乎
How to Connect to a Terminal from Your Browser Using Python WebSSH | DigitalOcean
self-signed 憑證的教學:基本上都是看這篇的
[SSL] 自簽憑證過程| 薛惟仁筆記本
[SSL] 數位簽名與驗證的過程| 薛惟仁筆記本
SystemD 呼叫 Python venv 的程式
Using Systemd to Start a Python Application with Virtualenv
How to enable a virtualenv in a systemd service unit? - Stack Overflow
How to run a command inside a virtualenv using systemd - Unix & Linux Stack Exchange
How to write a custom systemctl Linux service for Python scripts with virtualenv and .env file | by R | Medium
SystemD unit file 取得 hostname 的方式
How to get the machine IP address in a “systemd” service file - Super User
沒有留言:
張貼留言